PRINTING: Use landscape orientation and minimal margins to fit screenshots on page.
Microsoft Visual Studio .NET 2003 interactive development environment (IDE) is the easiest way to write and debug C++ programs on a Windows workstation, but it has a lot of features that can result in information overload for those who are new to it. To stay focused on what you really need to know to efficiently write C++ graphics programs, read on.
Tip: Don't
change anything without knowing why. You only need a fraction of the
Visual Studio’s features.
Normal window configuration
Showing the information you want
Where is the Focus?
Getting help about anything from anywhere
Help system navigation
Using right-click
Project propertiesBuilding Executables
Source files
The build menu
Build errors

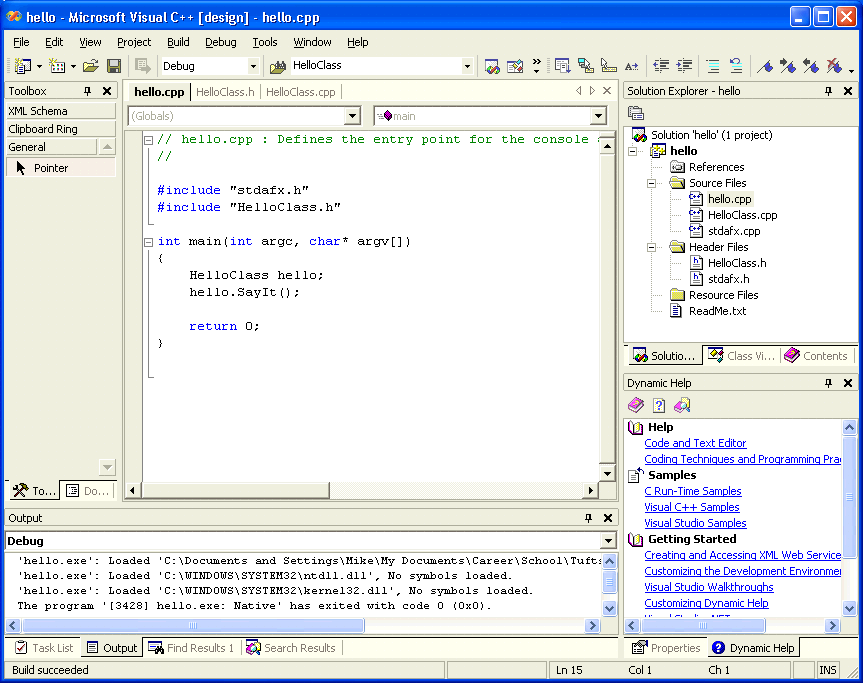
The normal window configuration has some interesting areas:
The Window Title Bar tells you what mode the Visual Studio is currently in, such as [design], [run], [break], etc. [design] is where you edit and build programs.
The Toolbar at the top under the menu changes depending on where the focus is, adding, subtracting, enabling, and disabling buttons.
The Toolbox pane on the left is not needed to complete the course assignments.
The pane at the top right hierarchically displays all the files in your project (Solution Explorer tab), all the classes in your project (Class View), and Help navigation information (Contents, Index, and Search tabs).
The Dynamic Help pane at the bottom right displays links to help that change as you move the cursor or click in different places in the window.
The pane at the bottom has several tabs displaying the results of some recent operation. In all tabs except Output, double clicking on a line in the list immediately opens whatever file the line is in and puts the cursor at that line. The most useful of the tabs at the bottom of the screen are:
Output: The text messages from the "tool" you recently ran, such as the compiler or debugger, selectable via the drop list at the top of this tab.
Task list: The errors and warnings from your last build if it failed, and optionally all comment lines in your source files that contain the word TODO.
Find Results: Lines in your source files containing the text you recently searched for.
Search Results: Help pages found by your recent search of the help system.
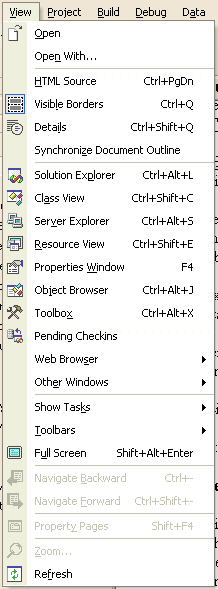
In most cases, to display information you want but is no longer visible, choose View from the main menu.

Most of the toolbars, panes, and tabs described above in Normal window configuration can be redisplayed by choosing them from the View menu.
Task List: To change what is displayed in the Task List, select Show Tasks under the View menu. View -> Show Tasks -> All displays all source lines contain the word TODO in the Task List, so you can put TODO into comments in your source as little reminders to yourself..
Restoring the normal window configuration: Choose Tools -> Options -> General -> Reset Window Layout from the main menu to restore the window configuration to normal as in the above screen shot
The Visual Studio behaves differently depending on which of its many onscreen objects has the focus. Focus is a GUI concept, referring to which screen element is currently active. This is usually the object that is accepting input, but things that don't accept any input can also have the focus. Input can be pressing a button with the Space bar or opening something by pressing Enter as well as typing text at the insertion cursor in an editor pane. The focus is usually changed by clicking somewhere on the screen or in some cases using the tab or arrow keys.
Tip:
A shortcut to get the focus back to the editor window from another pane is to
press Esc.
The Dynamic Help pane at the bottom right of the normal window configuration contains links into the Visual Studio help system that change depending on where the focus currently is. Pressing F1 opens the first link in this list, even if the Dynamic Help pane is not visible. Note that this works for elements of the Visual Studio like windows, tabs, forms, etc, and for text in source files such as language keywords and library class, function, variable, and constant names. This is particularly useful for getting parameter lists and other usage information about OpenGL functions.
Available Help:
Not available:
OpenGL Help: One caveat about the help for OpenGL is that some functions are not directly indexed in the Dynamic Help pane. For example glClear() has only one manifestation, so if the cursor is on glClear() in your source code, Dynamic Help can open a page about it. On the other hand, if the cursor is on the function glPixelStorei() in your source code, Dynamic Help will not find it because there is one help page named glPixelStore() about both flavors glPixelStorei() and glPixelStoref(). A workaround for this is to press F1 with the cursor is on the function name in your source code. This will open the Help index list of all GL functions with the one of interest highlighted. Double clicking the function in the index list will then open the correct Help page.
To display the hierarchical Contents of the help system: Click the first button (book icon) at the top of the Dynamic Help pane.
To see the Index of all keywords: Click the second button (paper ? icon) at the top of the Dynamic Help pane.
To open the Search tab where the text of the entire help system can be searched for words: Click the third button (magnifying glass icon) at the top of the Dynamic Help pane.
The help system is like Internet Explorer and is controlled by this toolbar:
Back, Forward: First and second buttons.
Favorites, Add to Favorites: The third and fourth buttons can be used to save "bookmarks" in the help system.
Web Page: Type the URL in the entry field and press Enter.
List similar topics: Sync Contents, the third button from the right, displays the help system hierarchical Contents with the current topic selected, so for example if you are viewing information about am OpenGL function, Sync Contents shows the list of all OpenGL functions.
Previous and Next topics in a sequence: The last 2 buttons on the right.
Right-clicking on almost any object in the Visual Studio environment pops up a menu containing most of the operations you might need to do on that object. This can reduce your having to remember which menu does what or what each button does.
Tip: If
in doubt about what to do, select the most relevant object, then right click on
it or press F1.
The structure of things in the Visual Studio is the solution (.sln file) contains zero or more projects (.csproj files), which contain zero or more items (typically source files). Solutions with zero projects and projects with zero items are not very useful. The homework assignments will be posted as starter solutions with projects and source files included so you don't have to create new ones from scratch.
Right click on a project name in the Solution Explorer tab and select Properties. The areas on the Properties form you typically care about are:
These may need to be set so the compiler and linker can find files specific to 3rd party libraries like GLUT.
Tip: There
is no need to change the active configuration of a homework from Debug to
Release.
Adding: The two types of items you may need to add to a homework project are C++ files (.cpp) and header files (.h). To create new files, right click on a project name in the Solution Explorer tab, select Add -> Add New Item, select the desired template and give it a sensible name. To add source files that already exist to a project, right click on a project name in the Solution Explorer tab, select Add -> Add Existing Item, and select the file(s) you want to add to the project. You can select more than one file at a time by holding down the Ctrl key while clicking.
Tip: You
can add source files from any directory, but your homework will be easier to
manage if all your source files are in the same project directory.
Removing: To remove a source file from a project, select it and press Del. The file is not deleted from the project directory, it is just no longer in the project.
Editing: The source files of a project can be opened for editing by double clicking them in the Solution Explorer tab.
Excluding from build: To prevent a source file from being compiled and linked when a project is built, right click on the file name in the Solution Explorer tab, select properties -> General, and change Exclude From Build to yes. This is useful for files you want to keep in a project for convenience, like templates or coding examples, but would prevent the project from building because they are incomplete or from another project.
Saving: To save the current file, press Ctrl-S. To save all changed files, press Ctrl-Shift-S.
Searching for text: The normal toolbar text search functions are  .
.
Searching in the current file: Type the text you want to find in the right field and press enter to find it in the current file. The field remembers your most recent searches. This is the same as main menu Edit -> Find and Replace -> Find or Ctrl-F.
Searching multiple files: The left (binoculars) button opens the Find in Files form to search (and optionally replace in) multiple files. The form is reasonably straightforward. Usually, you want to Look in Current Project. Replace in Files is handy for quickly changing a variable or class name in your project, but it's not quite as intelligent as the refactoring feature available in some other IDE's like Eclipse, so you need to use Replace All carefully and monitor the results.
Tip: To
find C++ identifiers, be sure Match case and Match whole word are checked in
the Find form, else searching for something like drawTriangle will get you
drawTriangleBase, drawTriangleOutline, drawTriangles, // drawtriangle in
box now, etc.
Tip: To
quickly find the word near the cursor, press Ctrl-F3, then F3 to find
successive occurrences.
Indentation: If the indentation of your source code gets screwed up by repeated editing, select the offending block of text and select from the main menu Edit -> Advanced -> Format Selection.
Bracket matching: With the cursor adjacent to a bracket character like {}[]<>(), press Ctrl-} to move the cursor to the matching bracket (if one exists).
To reduce typing: In many situations, the Visual Studio can auto-complete things you are typing. For example, in a C++ file, typing "cout." displays a list of all the members of the cout class so you can just pick the one you want rather than typing it. This also works with classes you have defined, and pointers to classes (->). Another example is when typing a function name, when you type the (, a temporary window pops up showing the entire function prototype (or choice of overloads) so you can see the return type and argument list. To initiate auto-completion in situations where the Visual Studio doesn't do it by default, press Ctrl-Space.
Building is the process of turning your source code text files into one or more files called targets that are used when your application runs. The homework assignment projects have a single target: a Windows native executable (.exe) file produced by compiling your source files into intermediate object (.obj) files that are then linked with various library files (.lib) and dlls.
Building your executable with the Visual Studio is different from UNIX in that you never explicitly run a compiler, linker, or other tools. Instead they are run as needed by the Visual Studio to create your target Windows native .exe file. You can think of this as the Visual Studio at build time running an implied "make" file determined by your project type, its source files and other items, and its dependencies on other projects and libraries.

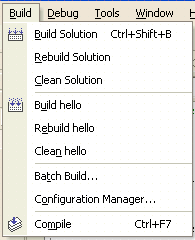
Build means compile and link only the source files that have changed since the last build, while Rebuild means compile and link all source files regardless of whether they changed or not. Build is the normal thing to do and is faster. Sometimes the versions of project target components can get out of sync and rebuild is necessary to make the build successful. In practice, you never need to Clean.
Build or Rebuild Solution builds or rebuilds all projects in the your solution, while Build or Rebuild <project name> builds or rebuilds the StartUp project, "hello" in the screen shot above. To set the StartUp project, right click on the desired project name in the Solution Explorer tab and select Set as StartUp project. The project name now appears in bold. Since the homework solutions typically have only one project, Build or Rebuild Solution is effectively the same as Build or Rebuild <project name>.
Compile just compiles the source file currently being edited. Useful to quickly check for errors when the rest of your source files are in an incomplete state that would prevent a successful build of the entire project. Ctrl-F7 is the shortcut key for Compile.
Tip: All
source files that have changed are saved when you request a build/rebuild, so
you don't have to bother saving them first.
Tip: When
you run your executable (F5 or Ctrl-F5), the Visual Studio saves all your
changed source files and builds anything that changed, so you don't need to
explicitly do those steps every time. This allows very rapid "trail and error"
debugging.
See Build Problems.